
 Geez..it has already been a month since my last post. Well, so much for my best laid plans! LOL! Well, this post should be good and lengthy with lots of pics to share, so hopefully that will make up for it. Tee Hee! It seems I have been busier than ever since mid- Feb, though- and not craft related, darn it! We moved into our house 4 years ago this spring and the main bathroom and our front living room have been an ongoing remodeling project ever since- it was either lack of time, money, or the combination of both that kept us from getting more done on it. So Craig took some extra vacation time off work and we decided to use our tax return money and worked our tails off and it finally turned out so great! Lots of color! But I can't tell you how much fun it is trying to paint and stain and do all this with a 5 yr old and 2yr old trying to "help" and getting into everything! LOL! (I couldn't figure out how to make each pic "clickable" so you could see it bigger- only the first and last in this post will do that for some reason-if anyone knows how to change that-let me know!)Here are a few "before" pics of the front living room:
 We took out all the baseboard heaters (there were originally five just in this room alone, can you believe it!) and replaced them with an energy efficient one with a fan under the bay window........about the area above the fireplace- there used to be a fake roof thingie that came down from the ceiling and jutted out from the wall- it even had rough wood shingles on it- yuck!
 I am thrilled how it came out! The walls are a lot darker and look more textured in person- the camera flash tends to brighten everything. I did a basecoat of pale cream and then did a tea stain glaze wash over the top- I wanted kind of a light venetian plaster texture look and thought I did pretty good for my first time! Thanks so much to my new blogging friend Stacey, for all her help when I was getting started last month! Your help and emails were tremendously appreciated!
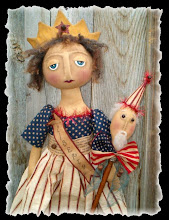
 The big Americana doll hanging from the old ladder was one I made last year from a Crabby Gabby pattern- she didn't sell on eBay and I kept her for me- she's my very favorite doll I got to keep!
 She sure is a big doll and this was the best place to display her I think. The other big doll on the pie safe is my second fav- another pattern of Heidi's (Crabby Gabby) .....she was another that didn't find a home on eBay and after the longest time, I finally found a place big enough to display her. The quilt bear in the chair and the one on the bench in the bay window I bought from Kathy at Kittredge Mercantile- she also painted the old scale on the pie safe and the tool carrier on the stove- which is not being used at the moment, so don't worry! LOL.
 I guess I can't really say the job in this room is 100% finished, though- more like 99.9%..tee hee...we ran out of chair rail trim above the wainscoting and had to get more, so there is a tiny piece missing between the two windows in the pics- we just keep forgetting it. LOL.
 I found an awesome early stencil design (thank you so much for your info Linda!) and stenciled with a dark khaki all around above the chair rail. I love it! We also replaced the sconces on both sides of the opening between the front room and dining room with candelabra fixtures that were approved for up to 60 watts. They look so much better than the original fixtures!
 Hmmm...Not sure if I like the barn star on the big wall above the shelf....it looks too empty- I'm looking for a pretty antique quilt to hang but haven't found one that "speaks" to me yet. When I was posting this pic I just realized I had some miscellaneous stuff/junk on the bench of my little childs desk- oopsie! LOL. Too late to retake the pic today- I'll replace it later.
We are just finishing the bathroom still, so no peeks at it yet-hopefully I'll have pics to share in my next post. The entryway area is not quite finished yet- here is a "before" pic:
 And an "in between" pic:
 Not really much different except the trim is off the doorway and I just started painting the walls a bit....I promise some pics when it is done....that'll be good for my next post...
 I had meant to share this little punchneedle before, but the camera I had before would not have taken as good of a pic. (Another tax return goodie-I finally got my new camera! A Canon Rebel XSi- I LOVE it!!) I bought the pattern last spring from Country Stitches and started on it and got busy doing other things- I finally got it done this fall and I really love it! It was my very first punchneedle and I was surprised how easy and fun it actually was- really easy to do in the living room watching TV with the family. It's a lot like rug hooking from what I've heard and I would just love to give rug hooking a try-like I need more hobbies! LOL! Speaking of getting things done, I need to get off this computer! I just barely got to step foot in my craft room again and I have some local orders for some dolls I need to finish up- plus I'm helping my mom out again with some tough personal stuff going on again in her world so I should get going and get some stuff done. :0)


